Recently, I have been working on a Computer Vision Project which requires me to use OpenCV Track API. However, this Track API is not available on the Pre-Built OpenCV Library. So, I need to build OpenCV from its original source and include the extra modules which contain the Track API.
![]()
Pre-requisite
Before I begin, make sure that you have already installed:
- Microsoft Visual Studio (in this case, I use Visual Studio 2013 in 64-bit PC)
- CMake for Windows (http://www.cmake.org/download/)
Optional: you might also need to temporarily disable any anti-virus software since it may prevent the process of building OpenCV.
Step-by-step Overview
- Downloading OpenCV with extra modules
- Making Visual Studio Project with CMake
- Building OpenCV project
- Developing application using OpenCV
Step 1: Downloading OpenCV with extra modules
First, let’s make a directory called “opencv-3.0” and make two other folder “build” and “source” inside it as depicted in figure below:

The build directory will be used for saving the result of building process, and the source folder will contain all of the OpenCV and its extra modules sources.
We can download OpenCV sources together with the extra modules from this following websites:
- OpenCV: https://github.com/Itseez/opencv
- Extra Modules: https://github.com/Itseez/opencv_contrib
After finish downloading, unzip each of them to designated folders as depicted in figure below:

As I mentioned before, the opencv folder will store all OpenCV sources, and the opencv_contrib folder will store all extra modules sources.
Step 2: Making Visual Studio Project with CMake
After we completely download and extract the OpenCV and its extra modules sources, we will use CMake application to make an OpenCV Visual Studio Project. The OpenCV Visual Studio Project will later be used to build the OpenCV library together with its extra modules completely.
So, let’s launch CMake application and then specify the source and build directory as shown in figure below. The red box must be filled with the directory path of OpenCV source, and the green box must be filled with the directory path of designated build folder.

After that, click the “Configure” button (yellow box), this is how we configure CMake to build the OpenCV library in our PC. Since I use Visual Studio 2013 in 64-bit machine, I will use the following configuration.

Push the “Next” button, and specify the C and C++ compilers. We can use the compiler in our local machine which is located in {Visual Studio}/VC/bin/cl.exe.

After that, hit “Finish” button and then let’s wait until CMake finishes its initial configuration. Whenever, the process has finished, we can see the configuration log denoting that it’s done as shown in figure below:

Next, we need to specify the extra modules path which is {opencv-3.0}/source/opencv_contrib /modules as depicted in figure below:

Please note that, you actually may uncheck several stuffs that in unimportant to speed up the building process, for example: BUILD_DOCS. However, if you don’t have any idea about what they are, just leave it as it is. After we have finished re-configuring, we need to hit the “Configure” button once again.
Now, let’s double check whether the desired extra modules are on the list. Go to the Configuration Log in the CMake GUI, and find “OpenCV modules” -> “To be built”. If everything goes well, the tracking module should also be there. Here is the example result of re-configuring the CMake with extra modules.
| OpenCV modules | |
| To be built | hal core flann imgproc ml photo reg surface_matching video face imgcodecs shape videoio highgui objdetect optflow superres tracking ts ximgproc xobjdetect xphoto adas bgsegm bioinspired features2d latentsvm line_descriptor saliency text calib3d ccalib datasets rgbd videostab xfeatures2d stitching |
| Disabled | world contrib_world |
| Disabled by dependency | – |
| Unavailable | androidcamera cudaarithm cudabgsegm cudacodec cudafeatures2d cudafilters cudaimgproc cudalegacy cudaobjdetect cudaoptflow cudastereo cudawarping cudev java python2 python3 viz cvv matlab |
After that, we can start generating the Visual Studio Project by pushing the “Generate” button. And voila, your build directory will be fulfilled with OpenCV Visual Studio Project. Check out this webpage that I use while learning about this step in here [1].
Step 3: Building OpenCV Project
Now, we need to launch the Visual Studio application open the OpenCV.sln file located in the build directory.

Note: if you use the C: directory probably you will need an Administrator privilege to build the OpenCV project, so you must also run the Visual Studio under the Administrator privilege.
After loading all of the project files, go to Solution Explorer, find the INSTALL project inside the CMakeTargets directory, and build that project. It may take several minutes for the whole building process to finish, just be patient.

Whenever the whole building process has been done, there will be several resulting new directories, such as: install, bin, and lib directory inside the build directory. We will use the install directory for building our own computer vision application. Here is how it looks like inside the install directory whenever the whole building process has been finished.

We can make Debug and Release version just by changing the build configuration of OpenCV project.
Now, we have already finished building our own OpenCV library as well as its extra modules. If you need another reference for installing OpenCV in Windows provided by the official OpenCV website, please refer to the following webpage [2].
Step 4: Developing Application using OpenCV
Now, that we have already built the OpenCV library, we can use it to build our own application which uses OpenCV great features. There are two main steps that are required:
- Registering OpenCV Environment Variables
- Creating OpenCV Project Property Sheet
Step 4.1: Registering OpenCV Environment Variables
Before we are able to use OpenCV in our application, we need to register OpenCV path to our system environment variables. First, we need to open the Environment Variables window, click “New”, and specify the new variable name and value. The new variable name should be “OPENCV_DIR” and the value should be the vc12 directory inside install\x64 directory. Here is the example:

By doing this, it will be easy for you to maintain your Open CV library. Just update this environment variable once you have the latest Open CV version. After that, we also need to modify the “Path” variable to register our OpenCV .dll directory. This can be done by adding %OPENCV_DIR%\bin entry at the last part of Path variable value.

Please note that I use %OPENCV_DIR% instead of static folder path. This will help when updating our Open CV version in the future. For more detailed step on how to set the environment variables refer to this webpage [3].
Step 4.2: Creating OpenCV Project Property Sheet
Now, we can start building our own application which uses OpenCV feature in Visual Studio. Here are the steps:
- Make an empty C++ project in Visual Studio
- Open the Property Manager View, right click on “Debug | 64” folder and “Add New Project Property Sheet” as shown in figure below:

- Specify the Property Sheet name, for example: OPENCV3_DEBUG and click “Add” to proceed to next step.
- Right click on the newly created Property Sheet and select Properties.
- Configure the Additional Include Libraries (Common Properties->C/C++/General) by adding the following entry: $(OPENCV_DIR)\..\..\include .This will help the C\C++ compiler to look for additional libraries while building our application.
- Configure the Additional Library Directories (Common Properties->Linker->General) by adding the following entry: $(OPENCV_DIR)\lib
- Specify all Additional Dependencies (Common Properties->Linker->Input) by adding all of the .lib files on the %(OPENCV_DIR)\lib directory. Please note, if we are creating Debug Mode Property Sheet, we must only specify .lib files which name are ended with “d” letter. For example: opencv_bgsegm300d.lib, opencv_bioinspired300d.lib. However, if we are creating Release Mode Property Sheet, we must only specify .lib files without “d”. For example: opencv_bgsegm300.lib, opencv_bioinspired300.lib. Here is the example:

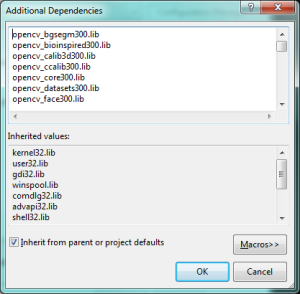
Debug Mode Property Sheet Release Mode Property Sheet - Click OK and start making your OpenCV application.


The advantage of using Property Sheet is that we don’t have to repeat this process over again when we want to start another OpenCV project. We can just add the existing OpenCV Project Property Sheet. For more info regarding this step, please refer to this webpage [4].
References
- eavise, “Building OpenCV yourself on Windows 7 x64 with OpenCV 2.4.5 and CUDA 5.0,” 2015. [Online].
- opencv, “Installation in Windows,” 2015. [Online].
- opencv, “Set the OpenCV enviroment variable and add it to the systems path,” 2015. [Online].
- opencv, “How to build applications with OpenCV inside the Microsoft Visual Studio,” 2015. [Online].

Thank you for making this great tutorial!
Everything works fine, but opencv_perf_core is giving me lots of errors.
Thank for this article, helped a lot.
Thank you for your article!
Could you clarify what are all the directories to be included when modifying the properties of the VS project? Using the shortcut OPEN_CV is giving me some problems, so I would like to insert the directories manually.
For the C/C++ / Additional Include Directories and for Linker / General / Additional Library Directories.
Thank you so very much!!
(Please disregard my previous comment concerning the OPENCV_DIR issue, I was looking at the wrong folder, since all .hpp files are inside install/include.)
This is a great tutorial!
Simple, clear, correct, useful, efficient.
I am glad, that this tutorial has saved people from having bad times in building and installing OpenCV.
Thank you very much for this tutorial. It really helped me a lot and I was able to program some command line programs.
Now I want to have a GUI but this seems a bit tricky. Could you also explain how to build OpenCV so that using the Qt features is possible? (http://opencv.jp/opencv-2svn_org/cpp/highgui_qt_new_functions.html)
I am not sure whether I can make that tutorial in the near future since I am having a tight schedule nowadays. However, someone else has just made a tutorial that may help you. Please check his post. https://zahidhasan.wordpress.com/2014/08/19/qt-5-3-1-64-bit-mingw-windows/
Thats what I did it in the end. Compiled Opencv with contrib modules but without Qt using MinGW. I display images in a QImage now so I don’t need the Qt functionality from Opencv itself anymore. I was just wondering how to make such things in VS2013.
Thank you anyway.
great tutorial to start with.thanks a lot.
in Step 4.2: Creating Open CV Project Property Sheet,after creating a new empty project,in debug|win32 debug|x64 is not getting created.could you please help
Glad to hear that, you’re welcome..
After creating new empty project, you need to configure it to be deployed on 64-bit machine. This can be done by opening Configuration Manager of your project. Right-click on your project, choose “Properties”, and hit “Configuration Manager” button on the top-right corner (VS2013). There you can add new active solution platform for Debug configuration which is x64 that will create the Debug|x64 on your project property.
Hey,thank you but I am having another problem now ,I am able to run my programs only in release mode in debug mode I get the following error:
error C1083:Cannot open include file:’opencv2/core.hpp’:No such file or directory
could you please suggest something?
1. Make sure that the OpenCV property sheet has been added to your Debug configuration.
2. Try re-building your proect on Debug mode.
Let me know if the problem still exists.
the problem still persists.I tried rebuilding my project on debug mode,its still not working.
Let me recall what your problem is: “Cannot open include file:’opencv2/core.hpp’:No such file or directory”, and this problem only occurs in Debug mode. I guess you didn’t specify the Additional Include Libraries of your Debug property. Please refer to step 5 while creating property sheet.
I have followed the instructions in step 5 but still the same errors in debug mode.
hi problem solved.made a new property sheet .its working now.thanks
Glad to hear that, if you find something missed/skipped procedures on the above instructions, feel free to let me know.
Cheers..
Hi,I had a query about how to build the opencv samples directory that comes with the package as i want to use the gpu module.currently if i use the following
#include
it shows cannot open source file opencv2/gpu/gpu.hpp
i checked my opencv2 folder and the gpu folder doesnot exist.so i thought of building the opencv samples and linking it.
If you want to use GPU, first make sure that your PC is equipped with CUDA graphic card. After that, you should enable WITH_CUDA option while building OpenCV.
Thanks for the guide.
However, when I build the INSTALL project in Visual Studio I get a LNK error stating that it cannot open the file ‘python27_d.lib2.
I have python 2.7 installed on this machine. Any ideas anyone?
Nevermind, I figured out that you have to build in Release mode rather than debug mode in order to use the python27.lib instead of python27_d.lib.
Also, maybe add to this guide that you need the 64 bit python install rather than 32 bit or you’ll get a lot of link errors.
Thanks for your additional note. Glad to hear that finally you have managed to build the OpenCV library. Building OpenCV in debug mode allows us to have more flexibility while investigating any internal errors during delopment, and release mode gives us more optimized code for deployment. So it will be nice if we can have both debug and release mode for our development purpose. There should be a way to obtain the python27_d.lib so that we can have the Debug mode version of this library.
You can build in Debug mode also, if you create a Visual Studio solution again with cmake after un-checking BUILD_opencv_python2.
Configure the project onece, then uncheck BUILD_opencv_python2 and reconfigure the project. The new Visual Studio solution wouldn’t look for Python debug libraries.
Help Please im getting 5 errors
Error 1 error C2039: ‘isVector’ : is not a member of ‘cv::_InputArray’ C:\opencv\sources\opencv_contrib\opencv_contrib-master\modules\ximgproc\src\sparse_match_interpolators.cpp 173 1 opencv_ximgproc
Error 4 error LNK1104: cannot open file ‘..\..\lib\Debug\opencv_ximgproc300d.lib’ C:\opencv\build\modules\ximgproc\LINK opencv_test_ximgproc
Error 5 error LNK1104: cannot open file ‘..\..\lib\Debug\opencv_optflow300d.lib’ C:\opencv\build\modules\optflow\LINK opencv_test_optflow
I am getting a similar error. Were you able to resolve this issue?
Help please, im getting a few errors
Error 5 error LNK1104: cannot open file ‘..\..\lib\Debug\opencv_optflow300d.lib’ C:\opencv\build\modules\optflow\LINK opencv_test_optflow
Error 1 error C2039: ‘isVector’ : is not a member of ‘cv::_InputArray’ C:\opencv\sources\opencv_contrib\opencv_contrib-master\modules\ximgproc\src\sparse_match_interpolators.cpp 173 1 opencv_ximgproc
Are you able to locate opencv_optflow300d.lib file on the “lib” directory? If it is not exist then there must be some problems during the building process.
Would you please send me all library and dll files of opencv3, there is problem for creating some library files for opencv_contribute that are needed to run surf and sift. bikramiswaitingu@gmail.com
try cancle WITH_CUDA when use cmake begin the second configure,or notice the if there has somelike about cuda error when use vs build then cmake cancle the correspond option
Hi do you also know how to install opencv contrib for windows 7 for use under python?
No, I don’t have any experience using python..
Thanks buddy, it’s the simplest tutorial I have come across for configuring the OpenCv libs. A big cheer to you 🙂
Excellent tutorial!!!! Easy to understand
The tutorial is excellent!!! Well written with screen shots!!
But somehow i’m not able generate staticlib files. I followed the procedure you had mentioned above. Can help me by pointing if i have missed anything
How to do it in Ubuntu?
I believe there are lots of articles about building OpenCV on Ubuntu. You just need to specify the extra modules path on cmake. Please refer to the official OpenCV Contrib GitHub page, there is an instruction on how to do it. https://github.com/itseez/opencv_contrib
Hi,good tutorial
Fatal error ..\..\lib\Debug\opencv_calib3d310d.lib
Any Idea?
Hi PAco, it seems that you are using OpenCV 3.1 which has been released couple of weeks ago. Sorry I cannot give you any suggestion at this moment. I haven’t had much time compiling the latest version. But I will keep you posted when I have tried it.
Hi, thanks for your tutorial, but when I build the install projection in the visual studio, the result has 88 success and 18 fail, I do not know whether it is influence. Thank you.
Hello. please help me,
I have this error while compiling wiith cmake and I dont know what is about
In file included from C:/Users/Cristina/Documents/opencv_contrib-master/modules/bgsegm/src/precomp.hpp:45:0,
from C:\opencv\sources\release\modules\bgsegm\opencv_bgsegm_pch_dephelp.cxx:1:
C:/Users/Cristina/Documents/opencv_contrib-master/modules/bgsegm/include/opencv2/bgsegm.hpp:43:29: fatal error: opencv2/video.hpp: No such file or directory
#include “opencv2/video.hpp”
^
compilation terminated.
modules\bgsegm\CMakeFiles\opencv_bgsegm_pch_dephelp.dir\build.make:71: recipe for target ‘modules/bgsegm/CMakeFiles/opencv_bgsegm_pch_dephelp.dir/opencv_bgsegm_pch_dephelp.cxx.obj’ failed
mingw32-make[2]: *** [modules/bgsegm/CMakeFiles/opencv_bgsegm_pch_dephelp.dir/opencv_bgsegm_pch_dephelp.cxx.obj] Error 1
CMakeFiles\Makefile2:3497: recipe for target ‘modules/bgsegm/CMakeFiles/opencv_bgsegm_pch_dephelp.dir/all’ failed
mingw32-make[1]: *** [modules/bgsegm/CMakeFiles/opencv_bgsegm_pch_dephelp.dir/all] Error 2
makefile:148: recipe for target ‘all’ failed
mingw32-make: *** [all] Error 2
I got the same problem with you, So i try to install Visual Studio and It works
Thanks a million! works perfectly…
If only people could read your article before trying out any other methods! sigh…
i am not visual studio and cmake please how to install opencv_contrib modules into the one already installed opencv3
I am not sure whether your approach is possible.
Hi!
I followed your tutorial step by step but I get an error when i build the INSTALL :
error LNK 1104: cannot open file ..\..\lib\Debug\opencv_bioinspired310d.lib
What is wrong?
Could you help me please?
Hi! I followed your tutorial step-by-step but I get an error when I build the Install : error LNK1104: cannot open file ….\lib\Debug\opencv_bioinspired310d.lib
What did I do wrong?
please make sure that the \lib\Debug\opencv_bioinspired310d.lib file exist.
Thanks! I have deleted the bioinspired module because I do not need it
anyway. Building the INSTALL worked and I followed the remaining steps, but when I want to use the include files (such as #include “opencv2/face.hpp”) I get this error: Cannot open include file: “opencv2/face.hpp”: No such file or directoy”. Is there another step I have to make? Sorry I am very new to OpenCV.
Ok I think I’ve solved the problem!
Thanks for your great tutorial.
Great to hear that you have solved the problem. Have fun making apps using OpenCV !
Hi buddy,
the useful tutorial I ever had. simple and good. I need your help please, I made a simple program and can run it from the visual studio in both modes (debug and release) but when I tried to run the exe file, I get an error “opencv_core.dll is missing”. the fact is that all dll files are exist in “C:\opencv-3.0\build\install\x64\vc14\bin” (like the instructions in your tutorial). any idea? thank you in advanced
Elad
Hi, thanks for the great tutorial! But I don’t have the folder install\ inside build. Instead, i have win-install\ and unix-install\ . Any idea what is wrong?
Never experience something like yours before. Are you able to locate the OpenCV (.dll), (.h), and (.lib) files inside that folders? If you are, then you can use those library files for developing your apps even if the resulting folder name is different.
Yes, I can find some .dll and .lib files in some folders. But only several .h files. So maybe move them from opencv and contrib folder would work, I haven’t tried it, though. Anyway, I managed to install those on Linux. Thank you again for your suggestion!
Thank you for posting such a detailed tutorial! Very helpful.
Don’t you need to build the ALL_BUILD in debug and release mode before build INSTALL?
No, I don’t
Hi! I followed your tutorial step-by-step but I get an error: LNK1104 cannot open file ‘opencv_bgsegm300.lib’ And I can’t find the opencv_bgsegm300.lib, why OpenCV300 doesn’t have opencv_bgsegm300.lib ?
Do you really need that extra module? If yes, then double check your build configuration. Go to the Configuration Log in the CMake GUI, and find “OpenCV modules” -> “To be built”. In the above article, it is mentioned in Step-2 Making Visual Studio Project with CMake.
Hey I folow your Great tutorial step by step. it is Very Usefull and Works allthough for opencv 3.1.0 on my laptop.
But as I tried to realize it on my PC at Work, it fails at the buidling part. The Erros are like this:
LNK1104: cannot open file ‘..\..\lib\Debug\opencv_optflow300d.lib’ but for more Files.
Do you know why I geet these Failure?
And sorry for my english it is not that good.
When you mentioned “the building part”, do you mean on step-3? If it is yes then there might be something wrong on the previous step.
Also, I am suspicious with the error message saying that it cannot open file ‘opencv_optflow300d.lib’. As you said that you are trying to build opencv 3.1.0 not the previous version (3.0.0).
It should mention something like ‘opencv_optflow310d.lib’. Notice the difference between 300d.lib and 310d.lib.
I have fixed it for MS Visual Studio 2015 their is no CUDA compatibility (or the other way). If CMake will include CUDA the Build under MS Visual Studio 2015 did not work in the right way (Part 3). So you are right, CMake don’t work in the correct way
I have uninstall the CUDA 7.5 Toolkit and then the Build of the install works without any trouble.
That was my experience with it maybe it will works with a new CUDA Release.
So your guide works also for MS Visual Studio 2015, OpenCV3.1.0 and Windows 10.
Thank you For the Greate discription!!!!!
You’re welcome. Glad to hear that 🙂
nice tutorial, really helpful. but i got some error. while configuration is done and giving path of extra module, and generating a result it gives me following error.
could not find a package configuration file provided by “OpenCV” (requested
version 3.0) with any of the following names:
OpenCVConfig.cmake
opencv-config.cmake
Add the installation prefix of “OpenCV” to CMAKE_PREFIX_PATH or set
“OpenCV_DIR” to a directory containing one of the above files. If “OpenCV”
provides a separate development package or SDK, be sure it has been
installed.
plz help.
I don’t quite understand what your problem is..
Thank you very much for those instructions that are very clear and functional. It saved me hours! Congratuations for sharing those steps.
Carlos Flávio Barreto Ferreira de Souza
FLEXDOC
Hi, everyone:
Followed the above procedures, we can compile these OpenCV 3.2 Source codes with VS 2013 Express under Win 10 professional platform, Our CPU is Intel i7 + 8G + independent graphic card.
Everything seem good ! Thanks for author’s kindness and help.
Brds,
James Hung
2017_Jan_24
Hi! thanks a lot for your tutorial! It was really easy to follow. However, I have an error with an extra module that I don’t understand:
I get “impossible to open opencv2/xfeatures2d” when I do “#include ” but the file “opencv_xfeatures2d320d.lib” is there in opencv_3\build\install\x64\vc15\lib. (I want to us SURF functions that are supposed to be in xfeatures)
Could you help me?
Thanks you very much !
Please help! I am stuck on step 2. While loading the C and C++ compilers, there is no folder named bin in the VC folder, so there is no cl.exe file, what do i do?
The same problem with me ! Could you have solved it ?
If you have already installed VS 2013 then “cl.exe” file should be located in your program files folder. In my case, it is C:\Program Files (x86)\Microsoft Visual Studio 12.0\VC\bin
If you still can’t find it, then try to find it using windows search feature.
Hello, first of all great tutorial! but i have a problem, i dont get the “x64” file inside the install folder once i run the builds and installs, all the other files are there (bin, etc, include, library), do you have any idea why? thanks in advance.
This works great. Followed it verbatim
Excellent Tutorial !! Searched for hours and this is the very best one. It explains and illustrates well, and does not assume that readers already know everything about everything, as so many “tutorial writers” do. For my own particular case, here are the notes I took while getting the build to work:
Used OpenCV v3.4.0
Had installed Python 3.4.4
Built using https://putuyuwono.wordpress.com/2015/04/23/building-and-installing-opencv-3-0-on-windows-7-64-bit
Do not use ++ in filenames or directory names.
https://stackoverflow.com/questions/35135061/opencv-3-1-cmake-error-if-source-or-bin-path-contains
When entering paths, use forward-slash, not backslash.
Had to remove all CUDA references from CMake dialog.
Had to switch build to Release build. Also must switch the configuration to Release.
If build errors occur, go through the build log looking for “fatal”. Then deal with those issues.
Hi I’ve been having an error and i’m not sure which part I’ve done wrong. Its when setting up the linker with the lib files. I have been getting this error:
LNK1104 cannot open file ‘opencv_core314d.lib’
Thank you very much!! 🙂
This explanation is perfect and worked Ok for me, well done!
Hi, I’m having a error C1083 “Cannot open include file’ ‘precomp.hpp’: No such file or directory” on the opencv_tracking inside the file feature.cpp
Can someone suggest something I already tried but no good results
Thanks
Thank you so much.
Very kindly explanation
For those who want to use SIFT, SURF, you have to also enable “OPENC_ENABLE_NONFREE”
when you build using CMake.
I have followed the tutorial and succeeded without problems. For anyone who experiences error LINK files, I suggest that you move the project directory, because what I have experienced is because the directory contains spaces.
Thank you, Bli